
For many writers, making the leap to writing in Microsoft Word can be intimidating—but with a little bit of practice Word is a great tool, whether you are writing a short story or a thousand-page novel.
When you first open up Word software, it will automatically open a blank white document. The default settings are normal body type in 12-point font with single line spacing (don’t worry if you don’t know what this means—we will get there). These default settings are a fine place to start writing. If you want to change them, you can navigate to the “Home” tab at the top of the window. It looks something like this:

This tool bar is where most of the tools you will need are located. Now, let’s break down the tools you’ll likely use the most.
Font
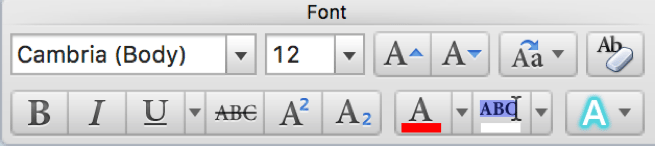
Font is the way your text looks on the page. This is the font toolbar. It is located in the far left of the “home” tab.
Style
Cambria (Body) is the style of the lettering. Word comes preloaded with hundreds of different fonts. If you are going to change the font, make sure it is clear and easy to read. The most popular three are Cambria (Body), Times New Roman, and Calibri. To change between fonts, click on the drop-down arrow next to the font title in the toolbar.
Size
![]() The next window, which is set to 12 in the image above, is the font size. Changing font size makes the letters become larger or smaller on the page. Twelve is a good size; it is small enough to maximize space on the page, but large enough it is easy to read. The two buttons next to it can size the text either up or down to the next size.
The next window, which is set to 12 in the image above, is the font size. Changing font size makes the letters become larger or smaller on the page. Twelve is a good size; it is small enough to maximize space on the page, but large enough it is easy to read. The two buttons next to it can size the text either up or down to the next size.
Letter Case
![]() The next two buttons are ways in which you can change the format of text in bulk. This button allows you to change the case of entire blocks of text. If you click it, a drop-down menu appears that gives the option to make text in all CAPS or all lowercase without having to retype it.
The next two buttons are ways in which you can change the format of text in bulk. This button allows you to change the case of entire blocks of text. If you click it, a drop-down menu appears that gives the option to make text in all CAPS or all lowercase without having to retype it.
Clear Formatting
The button immediately to the right (it looks like an eraser under the letters “Ab”) clears any formatting that may have been applied. To use these tools you have to click and hold while you drag the mouse over the text you want to change. Selected text will appear highlighted in blue.
Bold
The second row of buttons starts off with what looks like a large capital B. Clicking this button will make the text appear in bold instead of regular font. Bold is useful to put emphasis on a word or for titles and subtitles. Make sure you click the button again when you are done using the bold format—this ensures that the text returns to normal.
Italics
The next button to the right looks like a crooked capital I. Clicking this button will make all your text appear in italics or at a slant like so. Similar to bold, italics is useful if you want to draw attention to a line of text in your story. Make sure you click the button again when you are done with the italics to return the text to normal.
Underline
The next button to the right looks like an underlined capital U. This button will underline text for you. Underlining text is useful for titles and subtitles. Be sure you click the button again when you are done underlining to turn it off.
Color and Highlight
![]() The last two font tools you may need are font color and highlight. The first button that is the letter A with the bar of color under it allows you to type in colors other than black. Clicking it will show a menu drop-down where you can select a color. The second button works the same way, but instead of changing the color of the text, it highlights the text in the selected color.
The last two font tools you may need are font color and highlight. The first button that is the letter A with the bar of color under it allows you to type in colors other than black. Clicking it will show a menu drop-down where you can select a color. The second button works the same way, but instead of changing the color of the text, it highlights the text in the selected color.
Paragraph
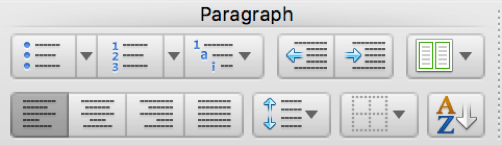
The next toolbar is called Paragraph, located immediately to the right of the font toolbar on the “Home” tab. The paragraph tools adjust where the text is located on the page.
Lists
![]() The first three buttons of this toolbar are options for creating a list. The first one that contains blue dots and lines creates a bullet point list or unordered list. The second button creates a numbered list. The third button creates a list in the format of an outline or multilevel list, with secondary and tertiary items indented further than main points.
The first three buttons of this toolbar are options for creating a list. The first one that contains blue dots and lines creates a bullet point list or unordered list. The second button creates a numbered list. The third button creates a list in the format of an outline or multilevel list, with secondary and tertiary items indented further than main points.
Align Text
![]() The four buttons below the list options are how the text aligns on the page. The first one (and the default) is align left, which means the text is level on the left margin. The second is align center, which means the middle of the line will be centered to the middle of the page. The third is align right, this means the text with be flush to the right margin. The fourth is called justified; this means the text will stretch to fill the entire space between the two margins.
The four buttons below the list options are how the text aligns on the page. The first one (and the default) is align left, which means the text is level on the left margin. The second is align center, which means the middle of the line will be centered to the middle of the page. The third is align right, this means the text with be flush to the right margin. The fourth is called justified; this means the text will stretch to fill the entire space between the two margins.
Spacing
![]() The last tool you should need in this toolbox is line spacing. This is the distance between each row of text. It defaults to 1.0, but it can be useful to set it to 2.0 if you are printing and want to be able to write edits in the space between lines.
The last tool you should need in this toolbox is line spacing. This is the distance between each row of text. It defaults to 1.0, but it can be useful to set it to 2.0 if you are printing and want to be able to write edits in the space between lines.
Other Helpful Tools
Spell/Grammar Check
Occasionally, you may misspell a word or use poor grammar in your writing. Word can pick up on this and will alert you. If you misspelled a word, a squiggly red line will appear underneath it. Right clicking on the word will pull up a menu of suggestions of what Word thought you meant.
Copy and Pasting
Have you ever typed a great paragraph, or maybe even a whole page, and then realized that it would make more sense lower down in the story? Well, Word has an easy fix for this. Highlight the text you would like to move by clicking and holding while you drag the mouse over your text. Once it is highlighted, on your keyboard click the COMMAND button and X button at the same time for Mac, or the WINDOWS button and x button on PC. This will make your text disappear. Then click with your cursor where you want the text to go, and on your keyboard, click the COMMAND button and the V button on Mac, or the WINDOWS button and V button on PC.
Saving
![]() It is extremely important to regularly save your work while working in Word. If your computer were to crash, it is likely that your work would be lost if you had not saved. In the top left corner of the window, there is a little icon that looks like an old-school floppy disk. This will allow you to save with just one click.
It is extremely important to regularly save your work while working in Word. If your computer were to crash, it is likely that your work would be lost if you had not saved. In the top left corner of the window, there is a little icon that looks like an old-school floppy disk. This will allow you to save with just one click.
Printing
Right next to the save button is an icon that looks like a tiny printer. Clicking that icon will bring up the print menu.
Word is a huge program, but don’t let it frustrate or intimidate you. Now that you know the basics, you will be able to get your story out of your head and onto paper—even if it is electronic paper
Leave A Comment